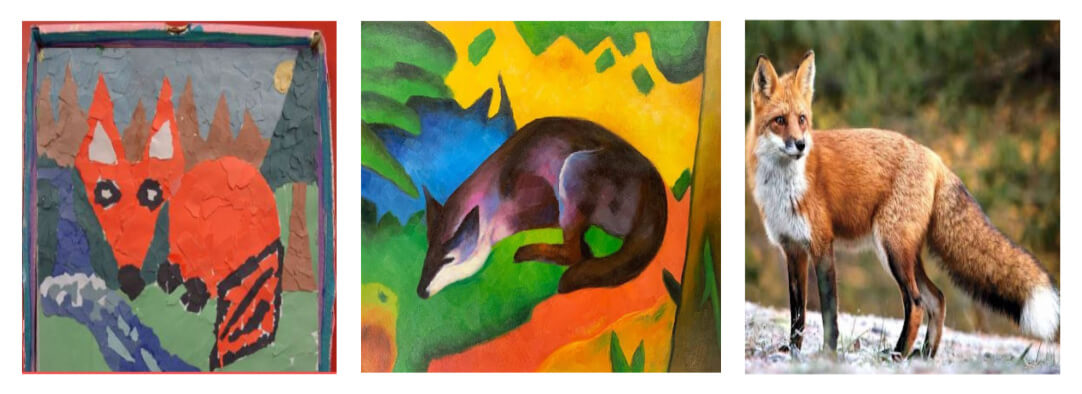
OBJECTIVE:
Students will discover the art of collage while creating a landscape that features a fox in their habitat.
NATIONAL CORE ART STANDARDS:
Anchor Standard #1
-Generate and conceptualize artistic ideas and work.
Anchor Standard #2
-Organize and develop artistic ideas and work.
Anchor Standard #3
-Refine and Complete artistic work.
Anchor Standard #5
-Develop and refine artistic techniques and work for
presentation.
INSTRUCTIONS:
Prep: Cut 12×12 light tag board sheets for each student. Cut off pizza box lid then assemble the bottom of the pizza box; glue & staple the corners. Paint outside & inside edges of the box with white or light color. I ask for parents/teachers to donate their old latex white, eggshell, or ceiling paints. Everyone has some old paint they’d like to get rid of. Using the pizza box lids, cut out some circles and triangles for the students to share for tracing the body of the fox. The circles (body) should be about the size of a “Cool Whip” lid, the head should be an isosceles triangle, the ears are made by cutting right triangles.
Step 1:
Bonus Media: I like to start off by engaging the students with a video about foxes. We briefly discuss the animal, his habitat, and share any fox stories. I also have fox books available and a large fox poster I hang up during the lesson days. For my classes that are showing me they are responsible with their time, I may treat them to the animated movie “Fantastic Mr. Fox” during class time. Music is always a part of our art production time. Songs that fit this lesson: “Fox on the Run” and “What Does the Fox Say“.
Directed Drawing of a Geometric Fox: Hand out 12×12 paper, pencils, and the tracing shapes. Demonstrate how to trace the circle. Start by placing the circle on the paper – near the middle but off to the right a bit – and trace, making the body of the fox. I tell my students, “Trace and Pass.” Allowing others to use the shapes too. Continue the same steps using the large triangle for the head. Ears can be free-hand drawn or traced. The tail needs to be BIG and wrap around our fox. Drawing a large triangle or a big diamond works well. Eyes, nose, and front paws are small circles: “the size of a glue stick lid”.

Step 2:
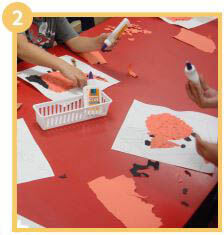
Collage Demo & Assembly of the Fox: Supplies needed: scrap and new construction paper, glue bottles. This is a torn paper collage – no scissors needed. Hand out their 12×12 geometric fox drawings. Demo a step-by-step tearing of construction paper and gluing pieces to make the fox collage. Emphasize working from “big to small”; focusing on areas that can use large pieces first while saving small, detail areas last. Stay in the lines – don’t lose the details. Students can use the visual aids, books, and teacher examples to match colors of the fox.
Step 3:
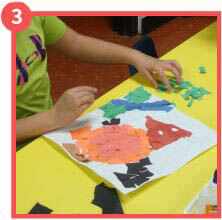
Landscape & Habitat: Demonstrate example on the board of how to draw a fox habitat. Explain that big organic shapes work better to collage that tiny details. Labeling colors on the paper can help to stay organized. Students free draw their habitat and will begin using the collage process to add colors to their landscape background. Reminder: Work big to small
Step 4:
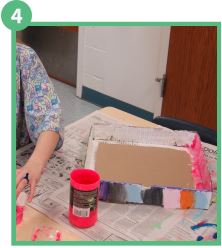
Paint Pizza Box Frame: Supplies needed: paint, brushes, pizza boxes. Using a pizza box as an example, explain to students they can paint & decorate the inside and outside edges of pizza box frame. Encourage them to make patterns, designs, or it can be “foxy” with fox faces, hearts, or a fox message like, “What does the fox say?” Also show them where NOT to paint – the big flat areas (on the back and where the fox art will go).
Displaying their Foxes: When everything is dry, teacher (or students) can mount their collage inside the pizza box frame using squirt glue. I use the thickest (folded) part of the box as the top of the frame. Apply glue around the edges of the collage and make a big X in the middle, then do the same on the inside of the pizza box. Sometimes I add book(s) for some weight to flatten the college more. When dry, I add a piece of yarn on the back to function as a hook. Attach with hot glue or sew it through the cardboard with a big needle and tie in a knot.
NOTES:
To make this art project a Display My Art fundraiser, glue collages to Display My Art Drawing paper and don’t attach it to a pizza box. Or you can take photos of your finished 3D work and glue that to our paper.
FUN FACTS:
While your students are working on their pieces, teach them these fun facts about foxes!