BACKGROUND:
Over the years, artists continuously worked to make their artwork more realistic. They learned about perspective, shading, proportions, form, value, and various other techniques to improve their skills. But in the late 1800s, there was a shift. Artists began to embrace bold colors and shapes that were not generally being used. This began the abstract art movement, in which artists focused less on creating realistic pieces and more on creating art that they considered pure. Some abstract art can still resemble a real object or scene but in a distorted way, while other works are completely nonrepresentational. Abstract art is still prominent today and can be seen in many different forms, such as this abstract pull string art.
OBJECTIVE:
Define and view abstract art. Create abstract paintings using the pull string painting method. Teach students a new method of creating art and allow them to explore a fun and creative technique.
Anchor Standard #1
-Generate and conceptualize artistic ideas and work.
Anchor Standard #3
-Refine and Complete artistic work.
Anchor Standard #5
-Develop and refine artistic techniques and work for presentation.
Anchor Standard #9
-Apply criteria to evaluate artistic work
INSTRUCTIONS:
Before starting this project, set up by cutting pieces of string or yarn into approximately 12 to 18 inch long pieces. The exact size can vary. Also, cover your tables in newspaper as this project tends to get messy. You will then have your students cover the pieces of string in paint and place them on their paper in a wavy shape. Then, they will pull the strings down in a fluid motion to create an abstract masterpiece. When your students are finished, discuss how to make a successful string art painting (color choices, overlap, how to place string, how to pull string, etc.). And finally, reflect on what makes the picture a success and what could use improvement.
Step 1:
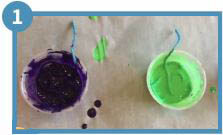
Add paint to 4-5 pieces of string or yarn.
Option #1 Saturate 4-5 pieces of string/yarn in separate cups of paint.
Option #2 Pour or squeeze a small amount of paint in different colors on one piece of string. Repeat this process with 4 or 5 pieces of yarn or string.

Step 2:
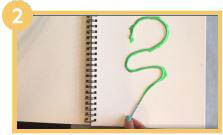
Place one string at a time in a wavy line or “S” shape on your paper. Do this without moving the string around on the paper at all to adjust it. Just place it down and leave it as is.

Step 3:
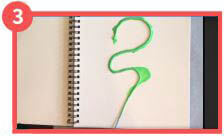
Gently and slowly pull string in a downward motion. Be careful with this step as it tends to get a little messy.

Step 4:
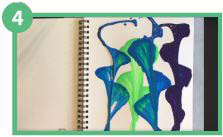
Repeat this process for each piece of string until paper is filled.

NOTES:
If you’re looking for a slightly different project–possibly for older students–check out this cool take on pull string art by GoMIX!
FUN FACTS:
While your students are working on their pieces, teach them these fun facts about abstract art!