BACKGROUND:
Jim Dine is an American artist known for a variety of different artistic techniques. His talents include, painting, drawing, printmaking, sculpting, and photography. His most famous works have been his paintings and prints which combine elements of Pop Art and Abstract Expressionism. His work is characterized by both bright splashes of color and bold black ink lines. Some of Dine’s collections feature ordinary tools such as wrenches, scissors, and of course the paint brush. These works had great significance to him as they allowed him to reflect on his childhood working and playing in his grandfather’s hardware store. As young artists, your students may also already feel a connection to the paintbrush.
Dine’s work can be found at the Metropolitan Museum of Art and the Museum of Modern Art, as well as many other museums throughout the country and world.
OBJECTIVE:
Students will learn about the artist Jim Dine and his rendering of everyday objects and tools. They will create detailed drawings of paintbrushes, from observation. Students will create a composition that utilizes the entire paper and creates eye flow. They will create emphasis with color in their work. They will create a finished work reminiscent of his paintbrush series.
NATIONAL CORE ART STANDARDS:
Anchor Standard #1
– Generate and conceptualize artistic ideas and work.
Anchor Standard #2
– Organize and develop artistic ideas and work.
Anchor Standard #3
– Refine and complete artistic work.
Anchor Standard #7
– Perceive and analyze artistic work
INSTRUCTIONS:
Students will view Jim Dine’s artwork examples from his paintbrush series and other tools he drew or printed. We will discuss choices artists make to create emphasis and composition in their works of art. Students will choose several paintbrushes to draw from observation on their paper. They will need to create a balanced composition and utilize the space. Color will be added for emphasis and interest.
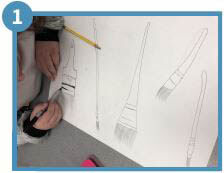
Step 1:
Choose 3 to 5 paintbrushes to observe while drawing. Students should utilize the entire paper and can draw brushes going off of the edges. Create a detailed line drawing of each paintbrush in pencil. They should draw the brushes larger than actual size!

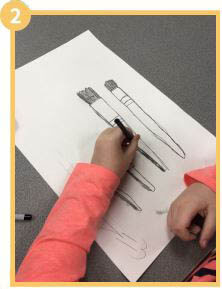
Step 2:
Outline the pencil line drawings with a thin, black permanent marker. Use an eraser to erase any pencil lines seen when completed. Choose one edge to add a shadow to each paintbrush drawn. Make sure all paintbrushes have the shadow on the same side. Use vine charcoal to draw and smudge a shadow along the drawn edge with your finger. Make sure to clean your hands after so your not getting fingerprints all over your work!

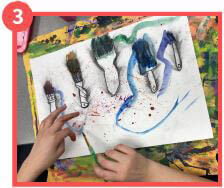
Step 3:
Add watercolor paints to the bristles and blank, negative space of the paper creating pools of color or brushstrokes that appear to have been made by the drawn brushes. Students can add controlled splatter if they choose. Aim brush downward and flick up with fingers or gently tap the brush with the opposite hand to create small droplets.

FUN FACTS:
While your students are working on their pieces, teach them these fun facts about Jim Dine!