BACKGROUND:
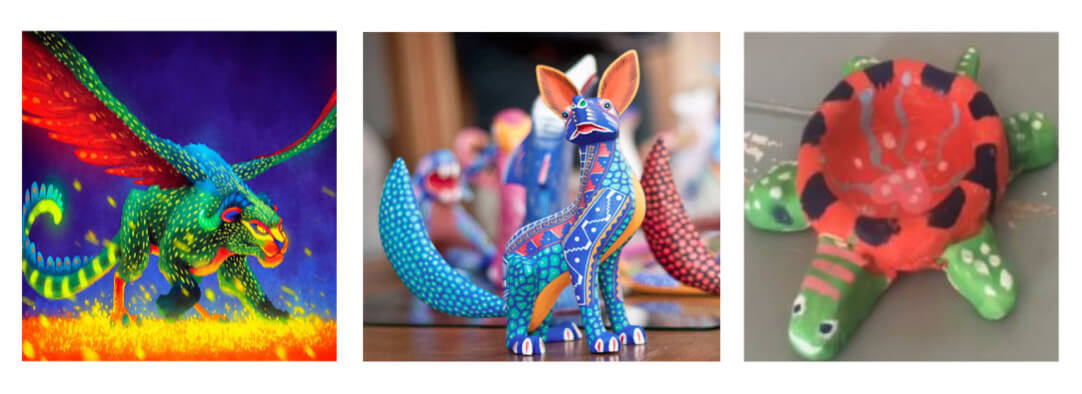
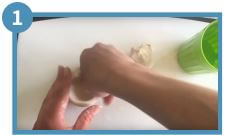
Oaxaca is a state in Mexico known for its wood carving statues. These statues, also known as alebrijes, were created by Pedro Linares in 1936 after he had a dream where hybrid animals were talking to him and shouting the word “alebrijes.” Linares began making his statues using paper mâché. But other Mexican artisans who had already been making statues out of wood began to create alebrijes using the technique they were familiar with and this has become the more prominent version of them. Many artists only use wood from the branches of the copal trees to better preserve the trees.
If you can, check out this outdoor installation of giant alebrijes at Cantigny Park in Wheaton, Illinois. It keeps Linares’ spirit alive and is sure to impress!
OBJECTIVE:
Describe and create an alebrije sculpture inspired by Oaxaca wood carving art. Teach students about the history and culture behind alebrije sculptures and their roots in Oaxaca, Mexico.
NATIONAL CORE ART STANDARDS:
Anchor Standard #2
-Organize and develop artistic ideas and work.
Anchor Standard #5
-Develop and refine artistic techniques and work for
presentation.
Anchor Standard #8
-Interpret intent and meaning in artistic work.
Anchor Standard #11
-Relate artistic ideas and work with societal, cultural and historical context to deepen understanding.
INSTRUCTIONS:
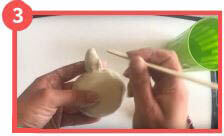
View examples of Oaxaca sculptures of Mexico and discuss their history. Create a pinch pot turtle from air dry clay. Paint your turtle sculpture using acrylic paint to resemble the patterns and colors of alebrijes.
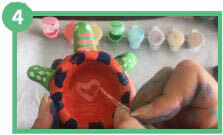
Step 1:
Using your air dry clay, create a pinch pot for the turtle shell. A pinch pot is created exactly how it sounds like it would be created. You take a ball of clay and form it into a bowl by pinching the sides until you get a shape you are satisfied with.
Step 2:
Separate smaller pieces of clay to create a head, 4 legs, and a tail to be attached. Shape them to your liking. Try to make the legs as even as possible so that your turtle will be able to stand. And keep your head small so that the turtle will stay balanced.

Step 3:
Attach a head, 4 legs, and tail to your pinch pot using a pencil to score the clay and Popsicle stick to smooth it out. Again, try to make sure the legs are placed so that the finished turtle can stand upright and not wobble.
Step 4:
Allow a couple days for clay to dry, then paint your sculpture with bright colors and patterns using acrylic paint. Remember that an alebrije is customarily a combination of multiple types of animals. Even though your alebrije is in the shape of a turtle, consider what other animals you can incorporate as you paint it.
NOTES:
FUN FACTS:
While your students are working on their pieces, teach them these fun facts about alebrijes!